
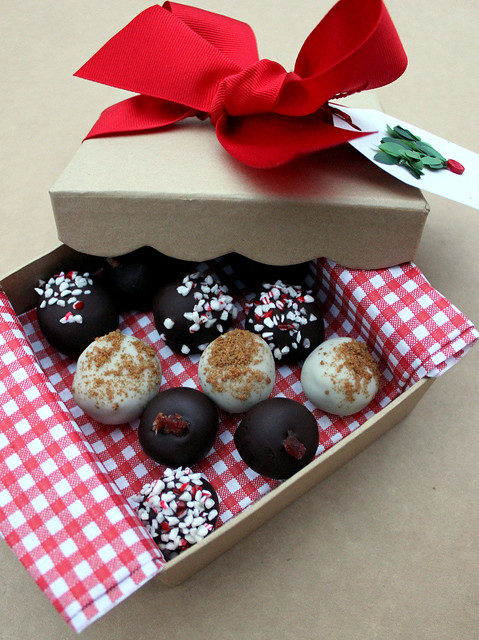
I decided on Peppermint and Dark Chocolate, Pumpkin Gingersnap, and Peanut Butter Bacon truffles. I made a quick trip to World Market and found some items like pre-chopped peppermint chips, adorable mini liners to hold the truffles, and all of the necessary chocolate. We were ready to open Willy Wonka’s.
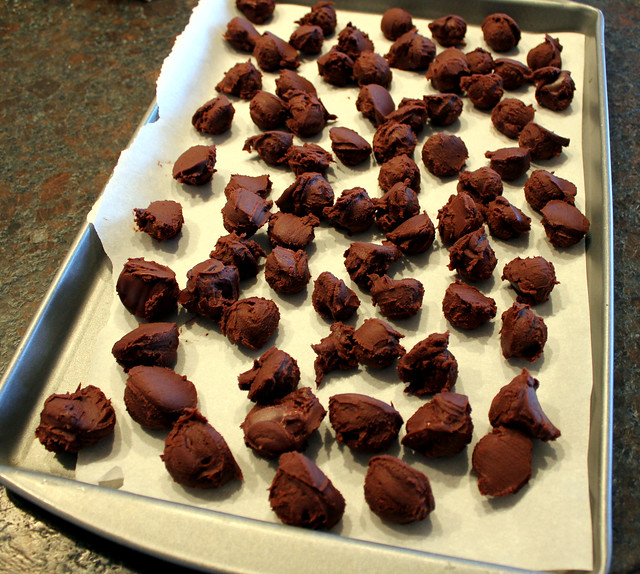
There are quite a few steps involved in the making of truffles, and they do take quite a bit of time with all of the chilling, but they were actually very easy, and dare I say… fun? The pictures below show the various steps for all three versions.
We kicked things off with the Peanut Butter and Bacon truffles. I mean, how can you go wrong?
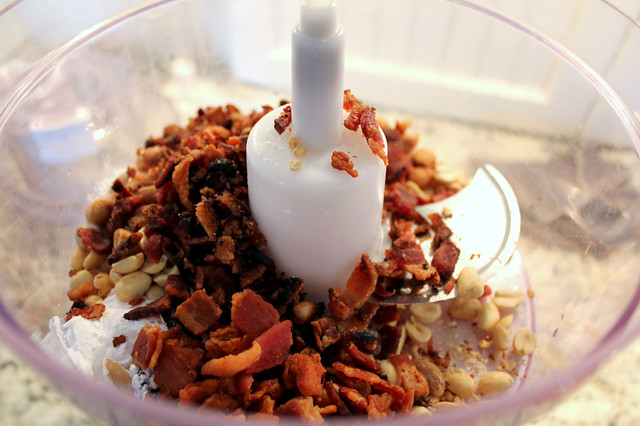
Some of the bacon was set aside to top the truffles. We ran into some issues with people snacking on it.

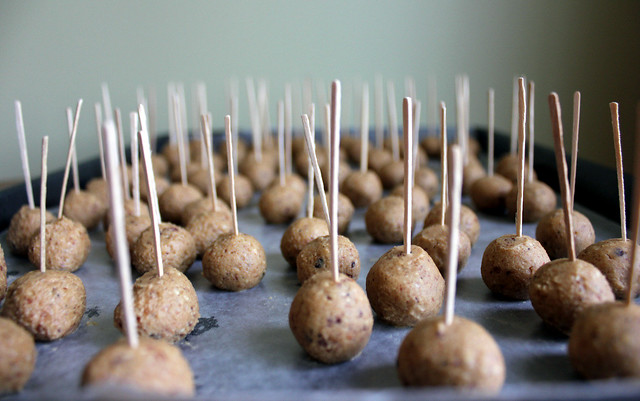

Time to dip! My mom is so smart. She came up with the idea to cover Styrofoam in plastic wrap to hold the drying truffles. Brilliant. The plastic wrap keeps the foam clean so you can use it again next year. Holding the toothpick I would dip the truffle into the melted chocolate (or almond bark for the pumpkin version) until it almost completely coats the truffle. I left a little space at the bottom so it did not stick to the toothpick and so they would stay put and not roll away. Then you stick the toothpick into the foam. We set the blocks outside in the chilly air until they hardened. Then you slip the truffle off the toothpick and they can be gently stacked in a container and frozen until ready to use.

My mom came up with another great idea for displaying the truffles on the small tray. She was afraid the liners would slide around so she put a dot of chocolate on the bottom of the liner and stuck it to the tray. It worked beautifully.


Since we made about 180 truffles we had to come up with innovative ways to give them away.


The truffles may not be as easy as the Chocolate Covered Peanut Butter Pretzels, but I think we may have found a new tradition. They are delicious and so stinking cute! I love them and I love giving them away.
Peppermint Dark Chocolate Truffle
Lindsay at Perfecting the Pairing
Ingredients:
· 1 cup good quality semisweet chocolate chips (Ghirardelli)
· 3 ½ cups good quality bittersweet (dark) chocolate chips (Ghirardelli), divided
· 1 ¼ cups heavy cream
· ¼ cup chopped peppermint
Directions:
Place one cup of semisweet chocolate and one cup of bittersweet chocolate in a medium bowl. Bring the cream to a simmer over low heat. When the cream begins to bubble, gently pour it over the chocolate chips. Stir with a whisk until melted and smooth. Cover the bowl with plastic wrap and chill until firm, at least two hours.
Line a baking sheet with waxed paper. Scoop out the chocolate into the desired size and place on the waxed paper. Repeat until all of the chocolate mixture has been used. Place the pan in the freezer for at least one hour, until the truffles have started to harden. Quickly roll the truffles in your palms to form smooth spheres. If they start to get too sticky, return the pan to the freezer, and repeat when they have hardened. Once the truffles have been rolled, stick a toothpick into the center of each and return to the freezer.
Temper the remaining two and a half cups of bittersweet (dark) chocolate in a double boiler over simmering water.* While the chocolate is melting, prepare your work station. Cover two Styrofoam blocks with plastic wrap, securing with tape. Place the chopped peppermint in a small bowl. Once the chocolate has melted, remove the truffles from the freezer. Begin dipping each truffle into the chocolate, while holding the toothpick.** Once coated, stick the toothpick into the foam and immediately sprinkle the top with peppermint. Repeat until all truffles have been coated in chocolate. Chill until the chocolate has hardened completely. Makes about 60 small truffles
*To temper the chocolate place two cups of the chocolate in the bowl over simmering water. Once it reaches 110 degrees remove the bowl and set aside. When the chocolate has cooled to about 90 degrees add in the remaining half cup of chocolate. You may need to place it back over the double boiler while dipping the truffles to make sure it stays smooth.
**I like to not cover the bottom of the truffle (the area surrounding the toothpick) so that the toothpick comes out easily. This also ensures a flat bottom so they don’t roll.
Pumpkin Gingersnap Truffles
Adapted by Lindsay at Perfecting the Pairing from Gimme Some Oven
Ingredients:
· 1/3 cup 100% canned pumpkin
· 1 ½ cup finely ground gingernap cookies, reserve a few tablespoons for the topping
· 3 Tb powdered sugar
· ¼ tsp vanilla
· ½ tsp cinnamon
· ¼ tsp ginger
· 1/8 tsp nutmeg
· 1/8 tsp salt
· 4 oz cream cheese, softened
· 1 cup white chocolate chips, melted
· 14 oz vanilla almond bark
· 1 Tb shortening
Directions:
Place the pumpkin, gingersnap crumbs, powdered sugar, vanilla, cinnamon, ginger, nutmeg, and salt in the bowl of a food processor. Pulse until combined. Add the softened cream cheese and melted white chocolate. Pulse until blended. Transfer to a medium bowl, cover with plastic wrap and freeze for at least one hour, until it has almost hardened.
Line a baking sheet with waxed paper. Scoop out the pumpkin gingersnap mixture into the desired size and place on the waxed paper. Repeat until all of the pumpkin mixture has been used. Place the pan in the freezer for at least one hour, until the truffles have started to harden. Quickly roll the truffles in your palms to form smooth spheres. If they get too sticky, return the pan to the freezer, and repeat when it has hardened. Once the truffles have been rolled, stick a toothpick into the center of each and return to the freezer.
Melt the almond bark in a double boiler over simmering water. While the bark is melting, prepare your work station. Cover two Styrofoam blocks with plastic wrap, securing with tape. Place the remaining gingersnap crumbs in a small bowl. Once the bark has melted, remove the truffles from the freezer. Begin dipping each truffle into the almond bark, while holding the toothpick.* Once coated, stick the toothpick into the foam and immediately sprinkle the top with gingersnap crumbs. Repeat until all truffles have been coated in almond bark. Chill until the bark has hardened completely. Makes about 60 small truffles
*I like to not cover the bottom of the truffle (the area surrounding the toothpick) so that the toothpick comes out easily. This also ensures a flat bottom so they don’t roll.
Peanut Butter and Bacon Truffles
Adapted by Lindsay at Perfecting the Pairing from The High Plains Sifter: Retro-Modern Baking For Every Altitude.
Ingredients:
· 2/3 cup powdered sugar
· ½ tsp salt
· ¼ tsp cayenne pepper (optional)
· 1 cup honey roasted peanuts
· 14 slices bacon, cooked until crisp, crumbled and divided
· 1 cup creamy peanut butter
· 2 ½ cups bittersweet/dark chocolate
Directions:
Place the powdered sugar, salt, cayenne pepper, peanuts, and most of the bacon (save about 60 tiny pieces of bacon to top the truffles) in the bowl of a food processor. Process until the peanuts are finely ground. Melt the peanut butter for about one minute in the microwave. Add the warm peanut butter to the food processor and pulse until evenly combined. Transfer the peanut butter mixture to a medium bowl and chill until it starts to harden, about two hours.
Line a baking sheet with waxed paper. Scoop out the peanut butter mixture into the desired size and place on the waxed paper. Repeat until all of the peanut butter mixture has been used. Place the pan in the freezer for at least one hour, until the truffles have started to harden. Quickly roll the truffles in your palms to form smooth spheres. If they start to get too sticky, return the pan to the freezer, and repeat when they have hardened. Once the truffles have been rolled, stick a toothpick into the center of each and return to the freezer.
Temper the two and a half cups of bittersweet (dark) chocolate in a double boiler over simmering water.* While the chocolate is melting, prepare your work station. Cover two Styrofoam blocks with plastic wrap, securing with tape. Place the reserved bacon in a small bowl. Once the chocolate has melted, remove the truffles from the freezer. Begin dipping each truffle into the chocolate, while holding the toothpick.** Once coated, stick the toothpick into the foam and immediately top with a small piece of bacon. Repeat until all truffles have been coated in chocolate. Chill until the chocolate has hardened completely. Makes about 60 small truffles
*To temper the chocolate place two cups of the chocolate in the bowl over simmering water. Once it reaches 110 degrees remove the bowl and set aside. When the chocolate has cooled to about 90 degrees add in the remaining half cup of chocolate. You may need to place it back over the double boiler while dipping the truffles to make sure it stays smooth.
**I like to not cover the bottom of the truffle (the area surrounding the toothpick) so that the toothpick comes out easily. This also ensures a flat bottom so they don’t roll.

Those look so yummy! I've tempered chocolate before and you have to take the chocolate off the heat BEFORE it reaches 110. The chocolate will keep raising in temp for a little while after you remove it. Sometimes it isn't worth it because I would eat your truffles up in a second, with or without the "snap"!
ReplyDeleteShelly, you are so right! I will definitely do that next time. I think I should also invest in a better candy thermometer. Thank you for the lovely comment!!
DeleteI LOVE THIS POST! And I can't wait to sample everything :)
ReplyDeleteI hope you loved them friend!
DeleteVery good recipe to make at home.
ReplyDeleteJoint Replacement India
How nice to see my book featured in such a lovely post. I hope the bacon truffles were good. Chris Reynolds
ReplyDeleteEven the most diligent students are not always able to use time resources wisely. And since a significant number of university students, in parallel with their studies, are also engaged in part-time work, not everyone is able to have time to hand over their term paper by the deadline. What to do when the examination session is just around the corner, and the course work has not even begun? In such a situation, the best option is to use the professional help of a company freepaperwriter com which over the years has established itself as high-level professionals
ReplyDeleteIndulge in The Truffle Experiment—a daring trio of bold, unforgettable flavors. Cool Peppermint Dark Chocolate delivers refreshing richness, Pumpkin Gingersnap blends warm spices with silky sweetness, and Peanut Butter & Bacon offers salty–sweet decadence. Crafted to surprise and delight, each truffle is an adventure for the palate and a celebration of creativity. Law Offices of SRIS, P.C.
ReplyDeleteThat you enjoyed the article makes me very happy! I hadn't thought about that before, but it's a great point. Your input gives the conversation a new perspective. I think your self-expression is excellent. Here, you've raised some excellent points.
ReplyDeletePalm trees